The WvW Commander System
1. What is a Commander?
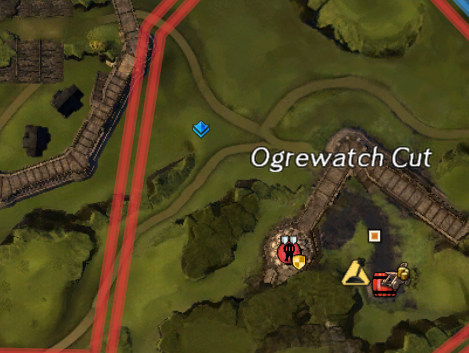
The Commander system is Guild Wars 2's public leadership tool for WvW (and open-world PvE events). A player with an active Commander Tag appears to everyone on the map — their tag is visible both above their character and on the minimap as a coloured diamond. Players can follow the tag to group together and receive direction in real time.
Commanders are self-appointed — anyone who purchases the tag can display it. There is no official vetting or certification. The WvW community evaluates commanders by their results: how many fights they win, how efficiently they capture objectives, how well they communicate, and how long players stay with them.
2. Getting the Commander Tag
The Commander Tag is purchased by acquiring a Commander's Compendium from a Commander Trainer NPC (found in most major cities and WvW spawn areas). The cost is 300 Gold + 250 Badges of Honor. Once purchased, the tag is permanently unlocked account-wide and can be activated or deactivated at any time for free. See the tag cost & where to buy page for full details.
There is also a Catmander's Compendium, purchasable from hidden Blue or Yellow Catmander NPCs for the same cost (300 Gold + 250 Badges of Honor). It unlocks cat-themed commander icons instead of the standard diamond tags. After owning either compendium, the other can be purchased at a reduced price of 150 Gold + 250 Badges of Honor.
| Item | Cost | Notes |
|---|---|---|
| Commander's Compendium | 300 Gold + 250 Badges of Honor | Unlocks standard diamond commander tags account-wide |
| Catmander's Compendium | 300 Gold + 250 Badges of Honor | Unlocks cat-themed commander tags account-wide |
| Second compendium (after owning one) | 150 Gold + 250 Badges of Honor | Discounted price for the alternate style |
| Activate / Deactivate Tag | Free | Toggled via the squad panel or Hero panel |
| Change tag colour | Free | 9 colours available; change anytime |
Purchasing a tag grants the ability to lead. It does not guarantee anyone will follow. Leadership in WvW is earned through communication, decision-making, and results — not by buying a 300g item.
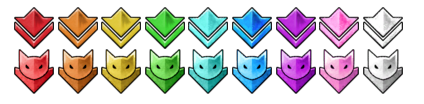
3. Tag Colours & Conventions
Commanders can choose from 9 tag colours: Red, Orange, Yellow, Green, Cyan, Blue, Purple, Magenta, and White. The colour has no mechanical effect — it is purely visual. However, most WvW communities have developed informal conventions for colour assignment:
| Colour | Common Convention |
|---|---|
| Red | Main zerg / primary commander of the map |
| Blue | Secondary zerg or primary on a different map |
| Green | Havoc group or secondary commander |
| Orange / Yellow | Scout commander, supply runner coordination |
| Cyan / Teal | Additional support tag or third havoc group |
| Purple / Magenta | GvG, training tags, or guild-internal commanders |
| White | Training runs or community-event commanders |
These conventions vary by server community and region. Always check your server's Discord for their specific colour usage before tagging up to avoid confusion.
4. Mentor Tag
The Mentor Tag (🔰 green badge) is a separate, cheaper alternative to the full Commander Tag. It is intended for teaching roles — helping new players learn the game — rather than organising large-scale raids.
- Costs significantly less than the Commander Tag
- Does not show on the minimap for players not in your squad
- Used by veteran players who want to guide newer players without leading a full zerg
- Commonly seen in PvE areas and occasionally in WvW's EotM training map
5. Squad Mechanics
A Commander can create a Squad — a special group of up to 50 players. Squads differ from regular parties:
| Feature | Party (5 max) | Squad (50 max) |
|---|---|---|
| Max members | 5 | 50 |
| Sub-groups | No | Yes — numbered 1–15, 5 members each |
| Commander visible on map | Party leader only | All map players see the tag |
| Pings & target calls | Party only | Entire squad |
| Role assignment | No | Yes — healers, DPS, tanks assigned by commander |
| Supply sharing | No | No (still individual) |
Sub-groups
Squads are divided into numbered sub-groups (1–15), each holding up to 5 players. Organised commanders assign sub-groups by role — "Group 1: Firebrands, Group 2: Scrappers, Groups 3–10: DPS" — allowing efficient healing and boon application since support skills prioritise nearby sub-group members.
Many AoE heal and boon skills in GW2 prioritise your own sub-group members within range. Staying in the same sub-group as your supports ensures you receive their heals and boons efficiently.
6. Squad Roles & Composition
A well-structured WvW squad assigns players to specific roles and groups them accordingly. The meta composition varies with balance patches, but the general structure is consistent:
| Role | Count | Professions | Responsibility |
|---|---|---|---|
| Boon Support | 4–8 | Firebrand, Scrapper, Herald | Stability, Quickness, Alacrity, Aegis uptime |
| Heal Support | 2–4 | Tempest, Druid, Heal Firebrand | Sustain heals, cleanse, Regen maintenance |
| DPS / Damage | 20–35 | Reaper, Dragonhunter, Scourge, Deadeye | Burst on called targets, AoE cleave, boon strip |
| Boon Strip | 3–6 | Chronomancer, Spellbreaker, Power Scourge | Strip Stability from enemy before burst, deny enemy boonballs |
| Commander | 1–2 | Any (often tankier builds) | Direction, target calls, movement decisions |
7. Common Voice Callouts
Effective commanders communicate clearly and concisely. These are the most common callouts you'll hear on voice comms:
| Callout | Meaning |
|---|---|
| "Stack!" | Move immediately to the commander's location and group up tightly |
| "Push!" | Advance aggressively into the enemy position |
| "Hold!" | Stop advancing; hold current position |
| "Retreat!" | Break off and run away from the current position |
| "Portal in 3… 2… 1… GO!" | A Mesmer is placing a portal exit; enter when the count ends |
| "Burst on [X]!" | Everyone activate their highest-damage skills on the called target |
| "Strip!" | Boon strippers activate all strip skills immediately |
| "Stab up / Stab down" | Stability is active / expired — adjust aggression accordingly |
| "Stagger!" | Do not press skills in sync; alternate skill activations to maintain pressure over time rather than one simultaneous burst (used in sustained fights) |
| "Drop wall!" | Deploy Scrapper Gyro or similar wall-of-AoE skill to create a denial zone |
| "Down in sub!" | A player in your sub-group is downed — rez them |
| "Full wipe!" | Enemy is fully defeated; move to capture a nearby objective immediately |
8. Zerg Structure
A properly run WvW zerg is not a mob — it is a layered formation:
- Frontline — tanky melee fighters and the commander. Absorb the initial impact, lock down targets, and break enemy lines.
- Mid-line — supports (Firebrands, Scrappers) positioned just behind the frontline. They must stay within range of both frontliners and backline DPS.
- Backline — ranged DPS (Reaper, Dragonhunter, Deadeye) positioned behind the main group, dealing damage while remaining protected by the frontline's engagement.
The single most common cause of zerg wipes is players "peeling" — running ahead of the frontline or lagging behind the group. A tight formation concentrates all heals, boons, and AoEs in a small area, multiplying their effectiveness. Spreading out dilutes everything.
9. Tactical Concepts
The Bomb
Stacking in a single location and activating all offensive skills simultaneously for maximum burst damage in one AoE area. Requires the entire squad to activate on the commander's signal. The most decisive but difficult tactic — if timed perfectly, it can wipe 50 players in under 5 seconds.
Portal Play
A Mesmer uses Blink and Mesmer Portal Me to create an entrance and exit point. The squad enters the portal at a safe location and emerges directly inside an objective's walls or behind the enemy. Counter-intuitive positioning enabled by portals is WvW's most surprising tactical element.
Split Push
Sending a smaller group (a havoc team) to attack an objective in a different location while the main zerg holds the enemy's attention. Forces the enemy to split, weakening both their defence and their current engagement.
Fake Push
Moving aggressively toward an objective to draw enemy defenders, then pulling back to attack a different target while they're out of position. Requires voice comms to execute cleanly.
10. Becoming a Commander
If you want to lead, here is the realistic path:
- Follow hundreds of hours of experienced commanders first. Learn the maps, the callouts, how squads move, what decisions look like. You cannot lead what you do not understand.
- Start with havoc (5–15 players) before scaling to full zergs. Small group coordination teaches the fundamentals without the chaos of 50-person management.
- Join a WvW guild with active commanders and shadow them. Many guilds have formal mentorship programs.
- Learn your class deeply — commanders who understand all roles make better decisions about squad composition and tactical targets.
- Build your voice presence. Clear, calm, decisive communication wins fights regardless of optimum tactics. Panic transfers to your squad.
- Study map control, not just fights. Great commanders think 3 moves ahead — where are the next dolyaks? Which objectives become vulnerable after this fight? What is the enemy likely to do next?
WvW communities are small and word travels fast. Commanders who communicate well, make decisive calls, and respect their squad members quickly build a following that logs in specifically to play under their tag. That loyalty is the most powerful resource a commander has.
Command Better with MistIntel
MistIntel gives commanders a real-time overview of all four maps simultaneously — objective ownership, flip alerts, PPT, and commander positions — so you always know where to be.
Open MistIntel →